|
Historical Railway Photograph Gallery 2451-2500 |
|||||||||
|
Photos 2451-2500 |
|||||||||
| Photo | ELR | Branch | Subject | Location | M | C | Elev'n | Date | Time |
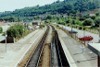
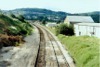
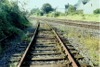
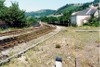
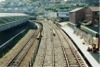
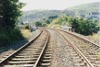
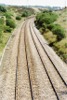
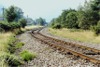
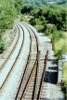
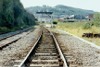 bpm02451.jpg |
CAM | Cardiff (Bute St) & Merthyr | Up Engineers' siding and up & down main lines approaching south end of Pontypridd station. The down line is fitted with a rail lubricator here. The former PC & N Jct signal box was located on the right | Approximate site of former PC & N junction, Pontypridd | 12 | 59 | SE | ||
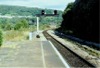
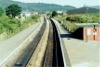
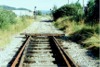
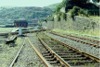
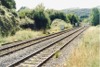
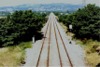
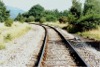
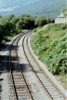
 bpm02452.jpg |
CAM | Cardiff (Bute St) & Merthyr | Termination of double lines into single bi-directional line just south of Pontypridd station | Adjacent to former PC&N junction, Pontypridd | NW | ||||
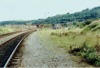
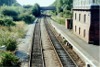
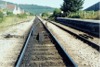
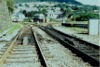
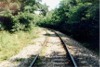
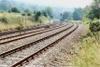
 bpm02453.jpg |
CAM | Cardiff (Bute St) & Merthyr | Looking south-east from the Treforest side of Pontypridd station | South-eastern extremity of Pontypridd platform | NW | ||||
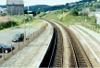
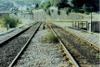
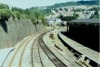
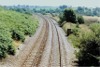
 bpm02454.jpg |
CAM | Cardiff (Bute St) & Merthyr | Looking south-east towards the platforms of Treforest station | North of Treforest station | 12 | 04 | North | ||
 bpm02455.jpg |
CAM | Cardiff (Bute St) & Merthyr | Looking towards Pontypridd from the footbridge of Treforest station | Treforest station footbridge | 12 | 00 | SE | ||
 bpm02456.jpg |
CAM | Cardiff (Bute St) & Merthyr | Looking towards Taffs Well from the footbridge of Treforest station | Treforest station footbridge | 12 | 00 | NW | ||
 bpm02457.jpg |
CAM | Cardiff (Bute St) & Merthyr | Looking north-west towards the platforms of Treforest station | South of Treforest station | 11 | 74 | South | ||
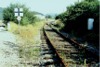
 bpm02458.jpg |
CAM | Cardiff (Bute St) & Merthyr | Looking south-east alongside site of former Treforest junction and interchange sidings with Barry Railway (A car park sits on the site on the right). The ex Barry lines from Cadoxton via Wenvoe passed over a 2-line bridge to the right of that seen in this scene but that section was removed after 1964 | Just north-west of the A473 Llantwit Road underbridge, Treforest. (Bridge is at 11M-69.25C) | 11 | 71 | NW | ||
 bpm02459.jpg |
CAM | Cardiff (Bute St) & Merthyr | Looking south-east at former site of Treforest yard sidings. The down distant signal for the now removed Maesmawr signal box is visible in the clear aspect. To the right, the former lines of the Barry-Wenvoe-Treforest lines left this point to climb southwards to Tonteg junction | A473 road underbridge, Treforest | 11 | 68 | NW | ||
 bpm02460.jpg |
CAM | Cardiff (Bute St) & Merthyr | South of Treforest station | 11 | 64 | NW | |||
 bpm02461.jpg |
CAM | Cardiff (Bute St) & Merthyr | South of Treforest station | 11 | 64 | SE | |||
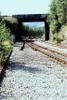
 bpm02462.jpg |
CAM | Cardiff (Bute St) & Merthyr | Road overbridge north of Treforest station | 12 | 12 | North | |||
 bpm02463.jpg |
CAM | Cardiff (Bute St) & Merthyr | Road overbridge north of Treforest station | 12 | 12 | South | |||
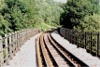
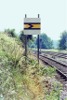
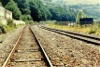
 bpm02464.jpg |
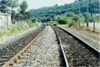
CAM | Cardiff (Bute St) & Merthyr | Footbridge at Taffs Well station | 7 | 21 | SE | 18-Aug-91 | 9.27 | |
 bpm02465.jpg |
CAM | Cardiff (Bute St) & Merthyr | Footbridge at Taffs Well station | 7 | 21 | NW | 18-Aug-91 | 9.27 | |
 bpm02466.jpg |
NAN | Nantgarw | Looking towards CWS level crossing at the severed Nantgarw branch. The runaway catch point/traps are still in position but the track is lifted from a point this side of the level crossing | Just north-east of Taffs well station | 0 | 01.5 | South | 18-Aug-91 | 9.27 |
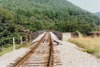
 bpm02467.jpg |
NAN CAM |
Nantgarw / Cardiff (Bute St) & Merthyr | Looking back towards the down main connection with the Cardiff & Merthyr line from the closed Nantgarw branch | Just north-east of Taffs well station | 0 | 02 | North | 18-Aug-91 | 9.32 |
 bpm02468.jpg |
NAN | Nantgarw | Looking north along the lifted Nantgarw single line to the former Nantgarw coke ovens plant | Former CWS level crossing, Taffs Well | 0 | 02 | South | 18-Aug-91 | 9.32 |
 bpm02469.jpg |
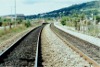
CAM | Cardiff (Bute St) & Merthyr | 1:9� Facing crossover in up main at Taffs Well station. This was the lead to the down main and facing connection further along, to the Nantgarw branch. The detection for the facing point lock and switch toes is visible. | Taffs Well station | 7 | 25 | South | 18-Aug-91 | 9.36 |
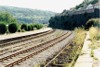
 bpm02470.jpg |
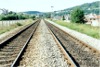
CAM | Cardiff (Bute St) & Merthyr | View of Pontypridd North junction as seen from the Merthyr branch and looking towards a 1:13 trailing crossover and Pontypridd station | Up & down Merthyr lines north of Pontypridd North junction | 13 | 09 | NE | 18-Aug-91 | 10.17 |
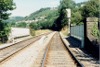
 bpm02471.jpg |
CAM | Cardiff (Bute St) & Merthyr | Looking towards Cilfynydd from a point just north of Pontypridd North junction on the Merthyr branch. Note the detonator placers either side of the lines | Up & down Merthyr lines north of Pontypridd North junction | 13 | 09 | SW | 18-Aug-91 | 10.17 |
 bpm02472.jpg |
THT | Pontypridd (North) jct & Treherbert | Looking towards Trehafod from a point just north of Pontypridd North junction on the Treherbert branch | Up & down Treherbert lines north of Pontypridd North junction | 13 | 08 | East | 18-Aug-91 | 10.18 |
 bpm02473.jpg |
THT | Pontypridd (North) jct & Treherbert | View of Pontypridd North junction as seen from the Treherbert branch and looking towards Pontypridd station | Alongside Pontypridd North junction signal box | 13 | 08 | NW | 18-Aug-91 | 10.18 |
 bpm02474.jpg |
CAM | Cardiff (Bute St) & Merthyr | View of Pontypridd North junction and signal box. The LH turnout is a 1:15 113A flatbottomed turnout and beyond is a 1:5 diamond crossing | North end of Pontypridd station | 13 | 03.5 | SE | 18-Aug-91 | 10.20� |
 bpm02475.jpg |
CAM | Cardiff (Bute St) & Merthyr | View of Pontypridd North junction from a new footbridge, with a new platform on the left which had just been constructed but was not yet open | Pontypridd station | 12 | 78 | SE | 18-Aug-91 | 10.28� |
 bpm02476.jpg |
CAM | Cardiff (Bute St) & Merthyr | Looking south from new footbridge at Pontypridd station with the new up platform still under construction | Pontypridd station | 12 | 78 | North | 18-Aug-91 | 10.28� |
 bpm02477.jpg |
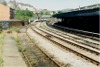
CAM | Cardiff (Bute St) & Merthyr | View of Pontypridd station as seen from the engineers' siding and beyond, taking in the new up platform which was still under construction | Pontypridd station | 12 | 73 | SE | 18-Aug-91 | 10.31 |
 bpm02478.jpg |
CAM | Cardiff (Bute St) & Merthyr | Looking south from engineer's platform at Pontypridd station | Pontypridd station | 12 | 72.5 | NW | 18-Aug-91 | 10.31 |
 bpm02479.jpg |
THT | Pontypridd (North) jct & Treherbert | Looking towards Trehafod from Welsh Harp road underbridge (Mill St) on the Treherbert branch just north of Pontypridd North junction | Welsh Harp (Mill St) road underbridge, Treherbert branch, Pontypridd | 12 | 20.25 | SE | 18-Aug-91 | 10.41 |
 bpm02480.jpg |
THT | Pontypridd (North) jct & Treherbert | Looking towards Pontypridd from the Treherbert branch just beyond the Rhondda Road underbridge. The 112-yard Rhondda viaduct is in the curve beyond the underbridge | Near Rhondda Road (A4058) road underbridge, Pontypridd | 12 | 17.25 | NW | 18-Aug-91 | 10.41 |
 bpm02481.jpg |
THT | Pontypridd (North) jct & Treherbert | The site of the former Rhondda Cutting signal box and junction. The cutting to the left of the signal took a double line chord to join the Cardiff & Merthyr line, so forming a running link between the two valleys without the need to run into Pontypridd and reverse. The then, A4058 road underbridge is seen just beyond the signal | Former Rhondda Cutting and signal box site, Pontypridd | 13 | 26 | NW | 18-Aug-91 | 10.43 |
 bpm02482.jpg |
CYA | Cylla | Looking south-east towards Ystrad Mynach from a point south of the former intersection of the Vale of Neath line which passed over this line | Between Ystrad Mynach & Penrhiwfelen | 14 | 31 | North | 18-Aug-91 | 11.28 |
 bpm02483.jpg |
CYA | Cylla | Looking north-west towards Penrhiwfelen from a point south of the former Vale of Neath line which passed over this line. The ganger's hut is at 14M-32C | Between Ystrad Mynach & Penrhiwfelen | 14 | 31 | South | 18-Aug-91 | 11.28 |
 bpm02484.jpg |
SWM | Severn Tunnel Jct & Fishguard Harbour | South Wales Main line viewed from an unclassified road overbridge at Lon L�s. From here, the line drops down to the Landore viaduct and Swansea beyond | Unclassified road overbridge, Lon L�s between Skewen and Swansea | East | 19-Jul-89 | 12.26 | ||
 bpm02485.jpg |
SWM | Severn Tunnel Jct & Fishguard Harbour | South Wales Main line viewed from an unclassified road overbridge at L�n Las. The fence- and tree-line bordering the former cutting taking a double line connection from Skewen to the mouth of the L�n Las tunnel and junction is discernable in the distance | Unclassified road overbridge, L�n Las between Skewen and Llansamlet | West | 19-Jul-89 | 12.26 | ||
 bpm02486.jpg |
SWM | Severn Tunnel Jct & Fishguard Harbour | Looking east along the South Wales Main line, along a cutting in the Llansamlet-L�n Las area | Non-road overbridge in cutting at L�n Las area | 211 | 05 | West | 19-Jul-89 | 12.22 |
 bpm02487.jpg |
SDI | Court Sart jct & Morlais jct | Looking north-west towards Felin Fr�n from an unclassified road overbridge 9 chains beyond the NW portral of L�n Las tunnel. A short viaduct spans the now lifted LMS single line from Swansea to Pontardawe, in the centre of the view | Unclassified road overbridge above Swansea avoiding line, Peniel Green area, east of Felin Fr�n | 1 | 59 | SE | 19-Jul-89 | |
 bpm02488.jpg |
HRD | Halls Rd jct & Penar jct | View looking west at the end of 173-yard Cwmcarn viaduct, showing guard rails in four-foot | Cwmcarn viaduct, north of Crosskeys | 1 | 15 | SE | ||
 bpm02489.jpg |
HRD | Halls Rd jct & Penar jct | 173-yard Cwmcarn viaduct viewed from south-east end and showing breather in track and guard rails on viaduct | Cwmcarn viaduct, north of Crosskeys | SE | ||||
 bpm02490.jpg |
HRD | Halls Rd jct & Penar jct | Looking north along trackbed of Halls Road branch in the vicinity of the former connection to Cwmcarn colliery which ran to the right of the scene | Former Cwmcarn junction area | SE | ||||
 bpm02491.jpg |
HRD | Halls Rd jct & Penar jct | Looking south towards Crosskeys from the area where the junction and sidings for Cwmcarn colliery were situated. Note the rail lubricator on the right hand rail | Former Cwmcarn junction area | NW | ||||
 bpm02492.jpg |
WVL HRD |
Park jct & Aberbeeg / Halls Rd | Up & down lines of the Western Valleys line to Ebbw Vale with the single line Halls Rd branch on the left | North of Lime Kiln junction & south of Crosskeys | NW | ||||
 bpm02493.jpg |
WVL HRD |
Park jct & Aberbeeg / Halls Rd | Up & down lines of the Western Valleys line to Ebbw Vale with the single line Halls Rd branch climbing away on the right. The original Halls Rd junction was located here but the single line on the right, ran all the way to Lime Kiln Junction lower down the valley | North of Lime Kiln junction & south of Crosskeys | ~6 | 45 | South | ||
 bpm02494.jpg |
WVL HRD |
Park jct & Aberbeeg / Halls Rd | The reflectorised (retro-reflective) "Caution" board for Lime Kiln Junction and applicable to the Halls Road bi-directional single line | North of Lime Kiln junction & south of Crosskeys | ~6 | 43.5 | SE | ||
 bpm02495.jpg |
WVL | Park jct & Aberbeeg | Remnants of the lead at Celynen south as viewed from an unclassified road overbridge. Celynen South groundframe is just visible beyond the location cabinets on the right | Abercarn or Tin overbridge at former Celynen South colliery connection | 9 | 45 | South | ||
 bpm02496.jpg |
WVL | Park jct & Aberbeeg | Looking south at the down & up Western Valley lines as seen from an unclassified road overbridge at Celynen south groundframe | Abercarn or Tin overbridge at former Celynen South colliery connection | 9 | 45 | North | ||
 bpm02497.jpg |
WVL | Park jct & Aberbeeg | The lifted siding connection at Celynen South colliery area showing the trailing connection still connected to the down Western Valleys line. The groundframe levers are just visible this side of the location cabinets on the left | Former Celynen South colliery connection | 9 | 47 | North | ||
 bpm02498.jpg |
WVL | Park jct & Aberbeeg | Up & down Western Valley lined with the severed connection at Celynen South groundframe whose levers are just visible near the location cabinets beyond the overbridge | Former Celynen South colliery connection & groundframe | 9 | 43.5 | South | ||
 bpm02499.jpg |
WVL | Park jct & Aberbeeg | Looking up the Western Valleys branch from an overbridge south of Crumlin. The River Ebbw passes under the nearer rail overbridge and in the distance the previous A472 road overbridge is seen. | Crumlin | 11 | 42 | South | ||
 bpm02500.jpg |
WVL | Park jct & Aberbeeg | Llanilleth | North | |||||
|
Photos 2451-2500 |
|||||||||
|
Date Last Revised:December 03, 2009 |
|||||||||