|
Historical Railway Photograph Gallery 601-650 |
|||||||||
| 551-600 <- |
Photos 601-650 |
-> 651-700 | |||||||
| Photo | ELR | Branch | Subject | Location | M | C | Elev'n | Date | Time |
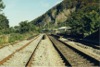
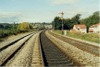
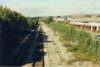
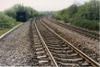
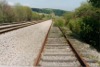
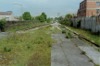
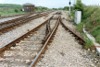
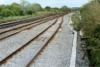
 bpm00601.jpg |
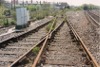
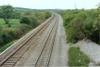
CAM | Cardiff (Bute Road) & Merthyr | Up & down main lines with out-of-use down relief lines on left (since lifted). Castell Coch is seen upper right of frame | Former Pentyrch Crossing | 6 | 29 | SE | 08-Oct-89 | 10.42 |
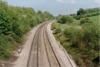
 bpm00602.jpg |
CAM | Cardiff (Bute Road) & Merthyr | Up & down main lines with out-of-use down relief lines (since lifted) | Approach to Taffs Well & at Pentyrch River bridge (over Taff) | 6 | 51 | SE | 08-Oct-89 | 10.45� |
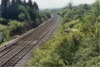
 bpm00603.jpg |
CAM | Cardiff (Bute Road) & Merthyr | Up & down main lines with out-of-use relief lines (since lifted) | Approach to Taffs Well, south-east of old road overbridge near Ynys Fach yard. | 6 | 68 | SE | 08-Oct-89 | 10.49 |
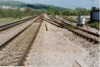
 bpm00604.jpg |
CAM | Cardiff (Bute Road) & Merthyr | Up & down main lines with out-of-use relief lines (since lifted), & showing the down main motored distant semaphore and permanent caution down relief distant for Radyr Junction �box. The surviving down main semaphore was replaced by a colour light unit upon the implementation of the Llandaff North-Pontypridd resignalling scheme in 1999 | SE of M4 motorway overbridge | 6 | 10 | SE | 08-Oct-89 | 11.04 |
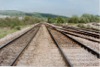
 bpm00605.jpg |
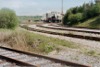
CAM | Cardiff (Bute Road) & Merthyr | View of 4-track reverse curve with relief lines out-of-use. (The latter were removed & the up & down main lines re-aligned to reduce the radius of curvature by the year 2000) | Between Taffs Well & Radyr | 6 | 00 | North | 08-Oct-89 | 11.07 |
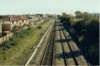
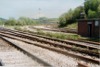
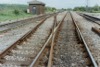
 bpm00606.jpg |
RAD | Radyr | View of northern end of Radyr yard with Radyr junction beyond | Radyr Yard | ~4 | 20 | SE | 08-Oct-89 | 11.27 |
 bpm00607.jpg |
CAM | Cardiff (Bute Road) & Merthyr | Up & down main lines with up relief line between Llandaff North and Radyr junction | East of Radyr Yard | 4 | 78.5 | SE | 08-Oct-89 | 11.30 |
 bpm00608.jpg |
CAM | Cardiff (Bute Road) & Merthyr | Track between Llandaff North and Radyr junction | South-east of Radyr yard | ~4 | 56 | SE | 08-Oct-89 | 11.35� |
 bpm00609.jpg |
CAM | Cardiff (Bute Road) & Merthyr | Track between Llandaff North and Radyr junction | North-west of Llandaff Loop Jct | 4 | 50 | NW | 08-Oct-89 | 11.38 |
 bpm00610.jpg |
CAM | Cardiff (Bute Road) & Merthyr | View from trackbed looking towards Llandaff North station road overbridge | South-east of Llandaff North | 4 | 17 | SE | 08-Oct-89 | 11.47 |
 bpm00611.jpg |
CAM | Cardiff (Bute Road) & Merthyr | View from Llandaff North station road overbridge showing path of former relief lines with Llandaff North signal box in distance | Road overbridge, Llandaff North station | 4 | 22 | East | 08-Oct-89 | 11.52 |
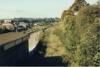
 bpm00612.jpg |
CAM | Cardiff (Bute Road) & Merthyr | View from College Road overbridge at former site of Roath Branch junction. The housing is built on the former yard & branch site | College Road road overbridge | 3 | 63 | NW | 08-Oct-89 | 11.58 |
 bpm00613.jpg |
CAM | Cardiff (Bute Road) & Merthyr | View of former up & down main lines with lifted relief lines in Llandaff area | College Road road overbridge | 3 | 63 | SE | 08-Oct-89 | 11.58� |
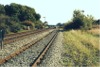
 bpm00614.jpg |
CRY | Coryton | View of Coryton halt as seen from old A470 road overbridge | Coryton halt (end of line) | 2 | 58 | NW | 08-Oct-89 | 12.07 |
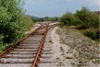 bpm00615.jpg |
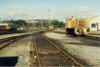
SWM | Severn Tunnel junction & Fishguard Harbour | Siding layout as viewed from south-west, headshunt end | West end British Coal sidings Llanharan disposal site | West | 12-May-91 | 15.15 | ||
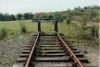 bpm00616.jpg |
SWM | Severn Tunnel junction & Fishguard Harbour | Headshunt buffer assembly at south-west end of Llanharan coal disposal site | West end British Coal sidings Llanharan disposal site | East | 12-May-91 | 15.20 | ||
 bpm00617.jpg |
SWM | Severn Tunnel junction & Fishguard Harbour | Siding layout as viewed from south-west headshunt end | West end British Coal sidings Llanharan disposal site | West | 12-May-91 | 15.35 | ||
 bpm00618.jpg |
SWM | Severn Tunnel junction & Fishguard Harbour | Track layout west of inlet from main lines, to Llanharan Coal disposal yard | East end of British Coal sidings, Llanharan disposal site | SW | 12-May-91 | 15.49 | ||
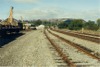
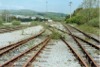
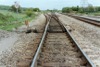
 bpm00619.jpg |
SWM | Severn Tunnel junction & Fishguard Harbour | Superelevated curve in main line alongside Llanharan British Coal disposal site | Alongside British Coal Llanharan disposal site | NE | 12-May-91 | 15.54 | ||
 bpm00620.jpg |
SWM | Severn Tunnel junction & Fishguard Harbour | Facing turnout & trailing crossover at BR entry from main lines to Llanharan British Coal disposal site | East end of British Coal sidings, Llanharan disposal site | 184 | 33.5 | 12-May-91 | 15.54 | |
 bpm00621.jpg |
SWM | Severn Tunnel junction & Fishguard Harbour | Up & down main line showing crossover & lead to British Coal sidings, Llanharan disposal site | East end of British Coal sidings, Llanharan disposal site | 184 | 32.5 | 12-May-91 | 15.55 | |
 bpm00622.jpg |
SWM | Severn Tunnel junction & Fishguard Harbour | View from main line looking towards sidings at British Coal sidings, Llanharan disposal site | Llanharan British Coal sidings & groundframe | 184 | 31 | NW | 12-May-91 | 15.57 |
 bpm00623.jpg |
SWM | Severn Tunnel junction & Fishguard Harbour | Lead from down main into British Coal disposal site, Llanharan, to sidings fan with down side backshunt spur running past right face of location cupboards | Llanharan groundframe | 184 | 31.5 | NE | 12-May-91 | 15.57 |
 bpm00624.jpg |
SWM | Severn Tunnel junction & Fishguard Harbour | View of short-radius curves running to overhead coal loading plant at east end of Llanharan, British Coal disposal site | Llanharan British Coal sidings | 184 | 30 | NW | 12-May-91 | 15.58 |
 bpm00625.jpg |
SWM | Severn Tunnel junction & Fishguard Harbour | Motored points & detection at facing junction British Coal Llanharan down main to British Coal yard inlet | Llanharan British Coal facing points inlet from down main | 184 | 30 | East | 12-May-91 | 16.00 |
 bpm00626.jpg |
SWM | Severn Tunnel junction & Fishguard Harbour | 113A trailing crossover at Llanharan British Coal site, showing electric motor points drive unit. View is from down main & looking in up direction towards Cardiff | Llanharan British Coal Yard | 184 | 29.8 | SW | 12-May-91 | 16.01 |
 bpm00627.jpg |
SWM | Severn Tunnel junction & Fishguard Harbour | View of short-radius curves running to overhead coal loading plant at east end of Llanharan, British Coal disposal site | Llanharan British Coal Yard | 184 | 29 | NW | 12-May-91 | 16.01 |
 bpm00628.jpg |
SWM | Severn Tunnel junction & Fishguard Harbour | Facing turnout from down main to British Coal Llanharan coal disposal site showing points motor and detection housing (to left of turnout) | Llanharan British Coal Yard | 184 | 29 | NE | 12-May-91 | 16.01� |
 bpm00629.jpg |
SWM | Severn Tunnel junction & Fishguard Harbour | View looking north-east from shunting spur at east end of British Coal, Llanharan coal disposal site | Llanharan British Coal Yard | 184 | 28 | SW | 12-May-91 | 16.05 |
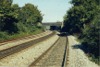
 bpm00630.jpg |
SWM | Severn Tunnel junction & Fishguard Harbour | View from A473 road overbridge looking towards Llantrisant. The former layout which included a goods yard, shed & cattle pen, is viewable on frame bpm00207.jpg | A473 road overbridge, east of former Llanharan junction |
183 0 |
65 00 |
West | 12-May-91 | 16.16 |
 bpm00631.jpg |
SWM | Severn Tunnel junction & Fishguard Harbour | View looking towards former Llanharan station site. The double line cutting to Wern Tarw and Tondu on the extreme right, is obscured by vegetation | A473 road overbridge, east of former Llanharan junction |
183 0 |
65 00 |
NE | 12-May-91 | 16.16 |
 bpm00632.jpg |
CAM | Cardiff (Bute Road) & Merthyr | Bute road single-line platform | Cardiff, Bute Street station | 0 | 07 | SE | 18-May-91 | 10.56 |
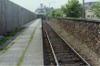 bpm00633.jpg |
CAM | Cardiff (Bute Road) & Merthyr | Bute road single-line platform | Cardiff, Bute Street station | 0 | 07 | NW | 18-May-91 | 10.56 |
 bpm00634.jpg |
CAM | Cardiff (Bute Road) & Merthyr | View looking north from north end of Bute Street station with severed second line which was used latterly by the private railway heritage group which moved to Barry Island as the Vale of Glamorgan Railway Co. Ltd in 1994 | Cardiff, Bute Street station | 0 | 10 | SE | 18-May-91 | 10.58 |
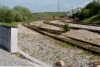
 bpm00635.jpg |
SWM | Severn Tunnel junction & Fishguard Harbour | View from down main line towards road overbridge showing recently laid HDPE conduits for signalling track-circuit cabling | Stormy Down | 195 | 22 | SW | 18-May-91 | 14.37 |
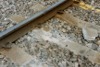
 bpm00636.jpg |
SWM | Severn Tunnel junction & Fishguard Harbour | Then newly-installed insulated fishplate in 113A FB track with insulated rail joint clearly visible between rail ends | Stormy Down | 195 | 21.5 | East | 18-May-91 | 14.38 |
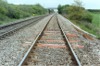
 bpm00637.jpg |
SWM | Severn Tunnel junction & Fishguard Harbour | View of main up & down main lines at Stormy Down looking up incline towards summit. A track-circuit re-cabling exercise had just been carried out and concrete ducting tidied up | Unclassified lane overbridge, Stormy Down | 195 | 16 | West | 18-May-91 | 14.43 |
 bpm00638.jpg |
SWM | Severn Tunnel junction & Fishguard Harbour | View looking towards Pyle from road overbridge between Kenfig Hill and Bridgend | Unclassified lane overbridge, Stormy Down | 195 | 16 | East | 18-May-91 | 14.43 |
 bpm00639.jpg |
SWM | Severn Tunnel junction & Fishguard Harbour | Detail of down loop to down main trailing connection with crossover beyond, showing points motor & temperature sensor box for heated switch. New HDPE conduits had just been installed for track-circuit cable connections to rails | Down loop exit, Stormy Down | 194 | 70.5 | West | 18-May-91 | 14.54 |
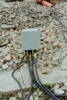 bpm00640.jpg |
SWM | Severn Tunnel junction & Fishguard Harbour | Then newly-installed track-circuit cable junction box showing cable ferrule identifiers | Down loop exit, Stormy Down | 194 | 70.5 | South | 18-May-91 | 14.56 |
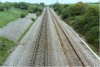
 bpm00641.jpg |
SWM | Severn Tunnel junction & Fishguard Harbour | View of up & down relief loop connections at west end of Stormy Down loop | Road overbridge at west end of Stormy Down loop | 194 | 75 | West | 18-May-91 | 14.57 |
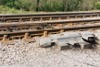
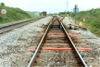
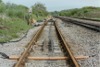
 bpm00642.jpg |
SWM | Severn Tunnel junction & Fishguard Harbour | Plan view of failing pre-stressed concrete sleeper just before replacement. A typical butt-welded joint is seen above the pandrol fixing | Stormy Down | 194 | 72 | West | 18-May-91 | 15.02 |
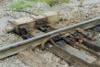
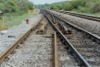
 bpm00643.jpg |
SWM | Severn Tunnel junction & Fishguard Harbour | View of Edgar Allen cast manganese crossing | Stormy Down, west end, down loop to down main trailing connection | 194 | 69.5 | West | 18-May-91 | 15.04 |
 bpm00644.jpg |
SWM | Severn Tunnel junction & Fishguard Harbour | Full switch catch-point at down relief line exit into down main | Stormy down, west end, down loop to down main outlet | 194 | 68 | West | 18-May-91 | 15.06 |
 bpm00645.jpg |
SWM | Severn Tunnel junction & Fishguard Harbour | Edgar Allen cast manganese crossing in down to up main line at Stormy Down | Stormy Down | 194 | 66.5 | West | 18-May-91 | 15.08 |
 bpm00646.jpg |
SWM | Severn Tunnel junction & Fishguard Harbour | Up main to up relief motorised facing turnout showing temperature sensor/ignition unit for propane-heated switch | Stormy Down | 194 | 62.5 | West | 18-May-91 | 15.11 |
 bpm00647.jpg |
SWM | Severn Tunnel junction & Fishguard Harbour | Close-up of points motor/detection/facing-point lock unit in up main to up relief (loop) at Stormy Down. The points were spiked and padlocked temporarily pending replacement of the trailing crossing at the Cardiff-end of the up loop line where the crossing had been removed (See other photo�) | Stormy Down | 194 | 62.5 | East | 18-May-91 | 15.12 |
 bpm00648.jpg |
SWM | Severn Tunnel junction & Fishguard Harbour | Down main to down relief loop showing motored catch points and adjustment switch *("breather") at Stormy Down | Stormy Down | 194 | 43 | West | 18-May-91 | 15.21 |
 bpm00649.jpg |
SWM | Severn Tunnel junction & Fishguard Harbour | Up relief to up main trapped outlet and adjustment switch ("breather") at east end of Stormy Down loop | Stormy up goods loop East outlet at signal PT155 | 194 | 38 | West | 18-May-91 | 15.25 |
 bpm00650.jpg |
SWM | Severn Tunnel junction & Fishguard Harbour | Up relief to up main loop outlet showing temporary closure rail at removed Edgar Allen cast manganese crossing which was awaiting substitution of a newer 2nd-hand crossing ex- Eastleigh. | East end of Stormy up goods loop | 194 | 36.5 | West | 18-May-91 | 15.26 |
| 551-600 <- |
Photos 601-650 |
-> 651-700 | |||||||
|
Date Last Revised:November 25, 2009 |
|||||||||