|
Historical Railway Photograph Gallery 2851-2900 |
|||||||||
|
Photos 2851-2900 |
|||||||||
| Photo | ELR | Branch | Subject | Location | M | C | Elev'n | Date | Time |
 bpm02851.jpg |
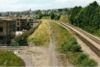
BRY | Cardiff (General) & Barry Pier | Looking south towards Barry station from the new Gladstone Rd overbridge, showing the up & down main Barry Branch and new flats under construction. The high level sidings stood to the left of the lines | Gladstone Road overbridge leading to the Waterfront, Barry, No.1 dock | 7 | 45 | East | ||
 bpm02852.jpg |
BRY | Cardiff (General) & Barry Pier | Looking north-east towards Barry Dock station from the new Gladstone Rd overbridge. All the High level sidings stood on the right of the Barry lines seen. Morrisons supermarket and other large stores now occupy the site on the right | Gladstone Road overbridge leading to the Waterfront, Barry, No.1 dock | 7 | 45 | SW | ||
 bpm02853.jpg |
VOG | Vale of Glamorgan | New road overbridge under construction, to serve housing development in former Aberthaw Cement Co's Rhoose quarry | Adjacent to the former Dams Lane cart crossing | 2 | 39.5 | East | ||
 bpm02854.jpg |
VOG | Vale of Glamorgan | New road overbridge under construction, to serve housing development in former Aberthaw Cement Co's Rhoose quarry | Adjacent to the former Dams Lane cart crossing | 2 | 42.5 | West | ||
 bpm02855.jpg |
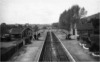
CTD | Cadoxton South jct & Trehafod jct | A black & white photo' record of Creigiau station when still open to passenger traffic | Unclassified road overbridge south of Creigiau station | 8 | 63 | South | 1960 | |
 bpm02856.jpg |
CTD | Cadoxton South jct & Trehafod jct | Creigiau station after closure to all traffic | Unclassified road overbridge south of Creigiau station | 8 | 63 | South | ||
 bpm02857.jpg |
CTD | Cadoxton South jct & Trehafod jct | Creigiau station after recovery of track by contractor | Unclassified road overbridge south of Creigiau station | 8 | 63 | South | ||
 bpm02858.jpg |
CTD | Cadoxton South jct & Trehafod jct | Creigiau signal box and goods yard when in full use (Black & white photo' record) | Unclassified road overbridge south of Creigiau station | 8 | 63 | North | 1960 | |
 bpm02859.jpg |
CTD | Cadoxton South jct & Trehafod jct | Creigiau signal box and goods yard after closure of line to all traffic | Unclassified road overbridge south of Creigiau station | 8 | 63 | North | ||
 bpm02860.jpg |
CTD | Cadoxton South jct & Trehafod jct | Creigiau signal box and goods yard after recovery of rails and awaiting removal of wooden sleepers by contractor | Unclassified road overbridge south of Creigiau station | 8 | 63 | North | ||
 bpm02861.jpg |
CTD | Cadoxton South jct & Trehafod jct | Up & down ex-Barry Railway lines south of Creigiau, after closure of branch to all traffic | A4119 road overbridge between Groes Faen and Capel Llanilterne | 8 | 9.5 | South | ||
 bpm02862.jpg |
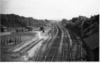
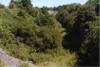
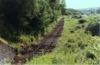
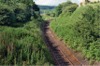
PRS | Penrhos | View of abandoned double line between Tynycaeau junction and Penrhos junction as seen from St.Fagans road overbridge. A water main also spans the track at this point | St.Fagans Rd overbridge south of Rhydlafar | 7 | 03 | SW | ||
 bpm02863.jpg |
PRS | Penrhos | View of cutting at St.Fagans Rd overbridge, after 36 years of dereliction. The structure carrying a water main still survives (2007) | St.Fagans Rd overbridge south of Rhydlafar | 7 | 03 | SW | ||
 bpm02864.jpg |
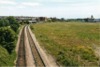
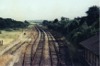
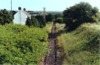
PRS | Penrhos | View of trackbed at St.Fagans Rd overbridge after complete closure of branch. The 7 mile-post is still in place on the left of the down line. | St.Fagans Rd overbridge south of Rhydlafar | 7 | 03 | NE | ||
 bpm02865.jpg |
PRS | Penrhos | Trackbed viewed from St.Fagans Rd overbridge looking towards Tynycaeau junction after down line completely recovered but up line sleepers still in place. | Immediately east of former Prince of Wales Orthop�dic hospital, Rhydlafar. A housing estate now stands here | 7 | 03 | North | ||
 bpm02866.jpg |
PRS | Penrhos | Abandoned double line south of Pentyrch, showing a single throw catch point in the up line | Immediately north-east of former Prince of Wales Orthop�dic hospital, Rhydlafar. | 7 | 03 | South | ||
 bpm02867.jpg |
PRS | Penrhos | Trackbed south of Pentyrch, after recovery of line by contractor | Immediately east of former Prince of Wales Orthop�dic hospital, Rhydlafar. (A housing estate now stands here) | South | ||||
 bpm02868.jpg |
PRS | Penrhos | Abandoned double line south of Pentyrch, showing an aqueduct which still exists (2007). The M4 motorway passes the camera point now | Immediately north-east of former Prince of Wales Orthop�dic hospital, Rhydlafar. | South | ||||
 bpm02869.jpg |
PRS | Penrhos | Almost recovered double line, showing an aqueduct which still exists (2006). The sleepers of the upline had still to be recovered. The M4 motorway passes the camera point now | Immediately north-east of former Prince of Wales Orthop�dic hospital, Rhydlafar. | South | ||||
 bpm02870.jpg |
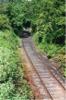
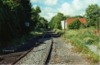
VON | Neath (General) & Pontypool Rd | Looking towards Bryn tunnel from Maesycmmer junction when the line was still in full use | A472 Road overbridge, north of Maesycwmmer | 10 | 07.5 | West | ||
 bpm02871.jpg |
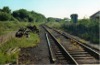
VON | Neath (General) & Pontypool Rd | Looking east towards Bryn tunnel after down line had been taken out of use and signalling recovered. The up line was until its demise, used for traffic to & from Britannia colliery, Bargoed and also with the Oakdale coal traffic for a short period so that all traffic was routed from here via the LMS Sirhowi branch through Wyllie to Newport | A472 Road overbridge, north of Maesycwmmer | 10 | 07.5 | West | ||
 bpm02872.jpg |
VON | Neath (General) & Pontypool Rd | The same view as frame bpm02869.jpg after backfilling of the VON line right through to Bryn tunnel | A472 Road overbridge, north of Maesycwmmer | 10 | 07.5 | West | ||
 bpm02873.jpg |
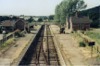
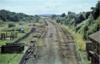
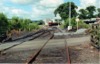
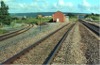
CMM | Burry Port & Cwmmawr | Looking across Tirclau level crossing towards the British Coal opencast disposal site, Cwmmawr. The right line through the level crossing ran back behind the camera point to a dead end spur and acted as a runaway safety siding. The left-hand line from the nearest points ran towards the former Cwmmawr station terminus and yard about � mile beyond | Tirclau level crossing, Cwmmawr | 12 | 26.25 | SW | 19-Jun-90 | 16.30 |
 bpm02874.jpg |
CMM | Burry Port & Cwmmawr | Looking towards the British Coal opencast disposal site, Cwmmawr. The right line ran back behind the camera point to a dead end spur and acted as a runaway safety siding. The left-hand line from the nearest points ran towards the former Cwmmawr station terminus and yard about � mile beyond | Tirclau level crossing, Cwmmawr | 12 | 27.15 | SW | 19-Jun-90 | 16.30 |
 bpm02875.jpg |
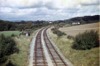
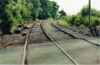
CMM | Burry Port & Cwmmawr | Looking south-west from Tirclau level crossing with the dead end safety runaway siding on the left and the single running line dropping away towards Pontyberem | Tirclau level crossing, Cwmmawr | 12 | 26.25 | NE | 19-Jun-90 | 16.30� |
 bpm02876.jpg |
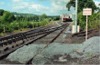
CMM | Burry Port & Cwmmawr | Looking north-east from Hirwaun level crossing towards Cwmmawr snd showing the anti-animal timbers. | Hirwaun level crossing, Cwmmawr | 12 | 05 | SW | 19-Jun-90 | 16.34 |
 bpm02877.jpg |
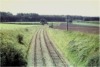
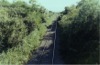
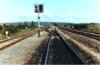
CMM | Burry Port & Cwmmawr | Looking south-west from Hirwaun level crossing towards Pontyberem showing bullhead rail standard chairs and concrete sleepers | Hirwaun level crossing, Cwmmawr | 12 | 05 | NE | 19-Jun-90 | 16.34� |
 bpm02878.jpg |
CMM | Burry Port & Cwmmawr | Looking north-east ftowards Maesmawr level crossing near a point where earlier there was a branch to the left for Glynhebog colliery | Maesmawr level crossing, north of Pontyberem | 11 | 28 | SW | 19-Jun-90 | 16.38 |
 bpm02879.jpg |
CMM | Burry Port & Cwmmawr | Looking north-east from Pontyberem level crossing where earlier there were two tracks and the station site. The down STOP board is on the right of the track | Pontyberem level crossing | 11 | 00.1 | SW | 19-Jun-90 | 16.46 |
 bpm02880.jpg |
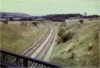
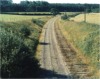
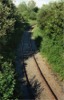
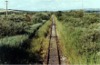
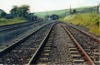
CMM | Burry Port & Cwmmawr | Looking south-west from a point below Pontyberem level crossing, showing timber sleepered bullhead single line | South of Pontyberem level crossing | 10 | 78 | NE | 19-Jun-90 | 16.47� |
 bpm02881.jpg |
CMM | Burry Port & Cwmmawr | Looking north-east towards Pontyberem level crossing showing the up STOP board | South of Pontyberem level crossing | 10 | 78 | SW | 19-Jun-90 | 16.48 |
 bpm02882.jpg |
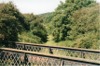
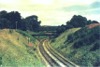
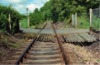
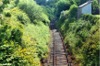
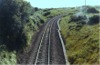
CMM | Burry Port & Cwmmawr | View from Plough Rd overbridge which is steeply graded and which was replaced in 1993. The bullhead track shows evidence of recent traffic but in 2006, was well overgrown here. The Cook's Siding (Heol-y-Parc) road overbridge is just 8 chains from this point beyond the curve | Plough Rd (Pont Plough) overbridge, Pontyberem (B4306) | 10 | 47.5 | NE | 19-Jun-90 | 16.53 |
 bpm02883.jpg |
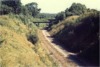
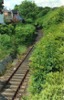
CMM | Burry Port & Cwmmawr | Looking north-east from Plough rd overbridge towards Cwmmawr when the line was still in use. In 2006 the cutting was swamped with vegetation | Plough Rd overbridge, Pontyberem (B4306) | 10 | 47.5 | SW | 19-Jun-90 | 16.54 |
 bpm02884.jpg |
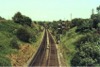
CMM | Burry Port & Cwmmawr | Looking north-east towards Plough Rd overbridge from Cook's siding (Heol-y-Pentre) road overbridge which had been blocked off to vehicular traffic | Cook's siding (Heol-y-Pentre ) road overbridge, Pontybererm | 10 | 39.5 | SW | 19-Jun-90 | 17.03 |
 bpm02885.jpg |
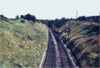
CMM | Burry Port & Cwmmawr | Looking south-west from Cook's Siding (Heol-y-Pentre) road overbridge, Pontyberem | Cook's siding (Heol-y-Pentre ) road overbridge, Pontybererm | 10 | 39.5 | NE | 19-Jun-90 | 17.08 |
 bpm02886.jpg |
CMM | Burry Port & Cwmmawr | Looking north-east towards former Ponthenry platform which is on the right. Previously a siding also existed on the left of the track | Heol-y-Pentre Rd overbridge, Ponthenry, south of former station | 8 | 51.5 | South | 19-Jun-90 | 17.26 |
 bpm02887.jpg |
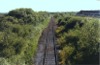
CMM | Burry Port & Cwmmawr | Looking straight down the track towards Pontyates from bridge No.14, Ponthenry | Heol-y-Pentre Rd overbridge, Ponthenry, south of former station | 8 | 51.5 | North | 19-Jun-90 | 17.26 |
 bpm02888.jpg |
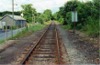
CMM | Burry Port & Cwmmawr | Looking north-west towards Ponthenry from Pontyates level crossing. The DOWN stop-board is on the right | Pontyates level crossing | 7 | 65 | South | 19-Jun-90 | 17.51 |
 bpm02889.jpg |
CMM | Burry Port & Cwmmawr | Looking south-west towards Kidwelly from Pontyates level crossing. This is the former station site | Pontyates level crossing | 7 | 65 | NE | 19-Jun-90 | 17.51 |
 bpm02890.jpg |
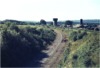
CMM | Burry Port & Cwmmawr | Looking towards Pontyates from the road overbridge north of the former Glyn Abbey halt | Glyn Abbey Rd overbridge No.11 (Pontnewydd) | 6 | 12.75 | SW | 19-Jun-90 | 18.02 |
 bpm02891.jpg |
CMM | Burry Port & Cwmmawr | Looking south-west towards Kidwelly from the road overbridge alongside the side of the former Glyn Abbey halt which stood on the right of the line | Glyn Abbey Rd overbridge No.11 (Pontnewydd) | 6 | 12.75 | NW | 19-Jun-90 | 18.02 |
 bpm02892.jpg |
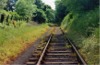
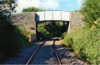
CMM | Burry Port & Cwmmawr | Looking north-east towards one of the very low headroom road overbridges (11'-9�" here), a common feature of the branch. Glyn Abbey halt previously stood to rear left of camera point | Glyn Abbey Rd overbridge No.11 (Pontnewydd) | 6 | 11.75 | SW | 19-Jun-90 | 18.04 |
 bpm02893.jpg |
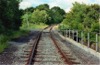
CMM | Burry Port & Cwmmawr | Looking south-west from Spwdwr (B4308) road overbridge. The coal heap on the right is within the area of Coedbach Washery which ceased to operate after 1996. In passenger days, Trimsaran Rd halt existed just in the right foreground | Spwdwr (Trimsaran Rd) overbridge, (B4308) west of Trimsaran | 4 | 75.25 | NE | 19-Jun-90 | 18.13 |
 bpm02894.jpg |
CMM | Burry Port & Cwmmawr | Looking north-east from Spwdwr road overbridge. A level crossing sign is just visible on the left in the distance and relates to Parc-y-Llong level crossing beyond | Spwdwr Rd overbridge, (B4308) west of Trimsaran | 4 | 75.25 | SW | 19-Jun-90 | 18.13 |
 bpm02895.jpg |
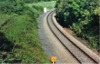
KID | Kidwelly | The curve coming away from the Kidwelly run-around loop east of Kidwelly in the former Tycoch junction where a branch to Kidwelly harbour ran straight ahead through the cutting visible. That branch was closed in 1929 | Old A484 road overbridge east of Kidwelly | 1 | 40.25 | East | 19-Jun-90 | 18.20 |
 bpm02896.jpg |
KID | Kidwelly | A pristine length of curved flat-bottomed rail with concrete sleepers and pandrol fixings. Evidence of the former Tycoch halt is visible through the vegetation on the left. | Old A484 road overbridge east of Kidwelly | 1 | 40.25 | West | 19-Jun-90 | 18.20� |
 bpm02897.jpg |
KID SWM |
Kidwelly South Wales Main |
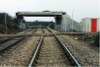
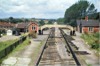
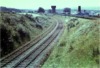
The run-around loop facility for the Kidwelly-Cwmmawr branch, east of Kidwelly station and signal box. The upgraded flat-bottomed permanent way was in use extensively until the demise of Coedbach Washery in 1996 | East of Kidwelly signal box, station and level crossing | 1 | 48.75 | SE | 19-Jun-90 | 18.23� |
 bpm02898.jpg |
KID SWM |
Kidwelly South Wales Main |
The Kidwelly-Cwmmawr branch running off to the left with the line from the South Wales up main line to the reception/departure and run-around loop (Behind camera) | Morfa Main crossing, east of Kidwelly signal box, station and level crossing |
1 233 |
48.75 79 |
NW | 19-Jun-90 | 18.24 |
 bpm02899.jpg |
KID SWM |
Kidwelly South Wales Main |
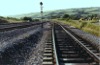
The reception/departure line linking the South Wales Main up & down lines east of Morfa Main level crossing. The run-around loop is on the left. The point reference is 422A & B and the turnouts are 1:9� fabricated in 1983. The ground signal ref. No. is 322 | East of Kidwelly signal box, station and level crossing |
1 234 |
60.5 11.25 |
NW | 19-Jun-90 | 18.26 |
 bpm02900.jpg |
SWM KID |
South Wales Main Kidwelly |
The headshunt at the west end of the reception/departure and run-around loop lines for the Kidwelly-Cwmmawr branch. The South Wales up & down main lines are on the extreme left | East of Kidwelly signal box, station and level crossing |
1 234 |
68.25 19 |
SE | 19-Jun-90 | 18.30 |
|
Photos 2851-2900 |
|||||||||
|
Date Last Revised:December 15, 2009 |
|||||||||