|
Historical Railway Photograph Gallery 451-500 |
|||||||||
| 401-450 <- |
Photos 451-500 |
-> 501-550 | |||||||
| Photo | ELR | Branch | Subject | Location | M | C | Elev'n | Date | Time |
 bpm00451.jpg |
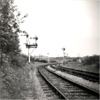
LTR | Mwyndy junction & Tonteg junction | 2-doll up homes bracket signal showing Llantrisant branch line from Mwyndy junction on left & converging line from Waterhall & Creigiau on right (Black & white) | South of Common Branch junction | ~1 | 60 | South | 1960 | |
 bpm00452.jpg |
CRY | Coryton | Headshunt at former A470 road overbridge (Black & white) | Coryton station (Ex Cardiff Railway) | 2 | 59 | SE | 1960 | |
 bpm00453.jpg |
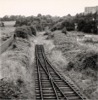
LTR | Mwyndy junction & Tonteg junction | Divergence of line to Cwm Llantwit & to Brofiscin branches (right) (Black & white) | Maesaraul junction, Cross Inn | 1 | 04 | 1960 | ||
 bpm00454.jpg |
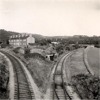
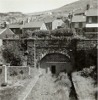
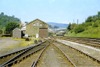
PTP | Port Talbot & Pontyrhyll | Neath Road station showing platforms, water crane, signal box & starting signal. This area is now landscaped and no trace of line exists. | Road overbridge, Neath Road, Maesteg | 7 | 20 | NW | 1959 | |
 bpm00455.jpg |
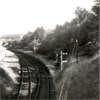
PTP | Port Talbot & Pontyrhyll | Black & white photo� of Neath Road station, Maesteg viewed from B4282 road overbridge & showing wooden semaphore post, signal arm, lamp & back-light blinder.Single line curve ran to Cwmdu & originally, Pontycymmer in the Garw valley. The area is now a grassed zone & the bridge from which this shot was taken, no longer exists | Former B4282 Road overbridge, Neath Road, Maesteg | 7 | 20 | SE | 1959 | |
 bpm00456.jpg |
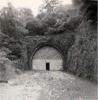
MEX | Merthyr Extension Line | East portal of bricked up 814yd Morlais tunnel (formerly LMS)(Black & white) | Pantyscallog, Merthyr |
18 19 |
75 32 |
East | 1959 | |
 bpm00457.jpg |
LTO | Waterhall junction & Common Branch junction | Out-of-use line between Creigiau Quarry & Common Branch junction. This was temporarily brought back into use in 1964 until closure of Creigiau Quarry in 1970s (Black & white) | Creigiau-Efail Isaf road overbridge near C�sar�s Arms | 8 | 13 | East | 1959 | |
 bpm00458.jpg |
BND MEX |
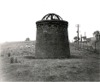
Brecon & Dowlais Merthyr Extension Line | One of the three Morlais tunnel (LMS) ventilator shafts with Pant signal box in background. This is situated right alongside the later-built Brecon Mountain Railway centre at Pant. The Pant Dowlais Central branch passed just north of this and its cutting is just visible and there was a platform here (Black & white photo�) | Brecon Mountain Railway centre, south-west of former Pant station. Stated mileage is estimated and is the BND figure | ~18 | 75 | South | 1959 | |
 bpm00459.jpg |
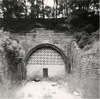
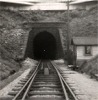
MEX | Merthyr Extension Line | South-west bricked up portal of 814yd Morlais tunnel (LMS) one year after closure of line. (Black & white photo�) | Former Morlais junction on Merthyr & Pontsticill branch |
18 19 |
75 32 |
SW | 1959 | |
 bpm00460.jpg |
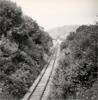
MEX | Merthyr Extension Line | Trackbed of former LMS line at approach to Morlais Tunnel junction as viewed from tunnel portal (Black & white photo�) | South-west portal of Morlais tunnel, Pant, Merthyr | 19 | 34 | NE | 1959 | |
 bpm00461.jpg |
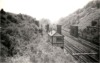
BAL | Bridgend & Abergwynfi | North-west portal of 1595-yard Cymmer Tunnel showing 2-lever groundframe for junction to sidings fan and Glyncorrwg branch. The concrete raft over the portal carried the A4107 road. The far end is visible as a white spot. This tunnel was sealed off in 1970's and the hairpin bend above this portal, eased (Black & white photo�). Like some other long tunnels, the track was fitted with "clappers" not far inside from the tunnel mouths so that an audible warning would be given to train drivers, that they were approaching the end of the tunnel, during complete darkness | NW portal of Cymmer Tunnel, Cymmer Afan. Tunnel limits were 10M-17C to 11M-10C | 11 | 11 | NW | 1959 | |
 bpm00462.jpg |
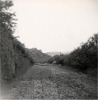
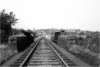
LTR | Mwyndy junction & Tonteg junction | Reballasted single line curve viewed from A473 road overbridge between Cross Inn & Llantwit Fardre (Black & White photo�) | North of former Common Branch junction, Cross Inn | 2 | 25? | North | 1959 | |
 bpm00463.jpg |
CTD | Cadoxton South junction & Trehafod junction | Bricked up north-west portal of 1323 yard Pontypridd Tunnel (The Graig) (Black & white photo�) | Former Pontypridd (Graig Station) Barry Rly | 14 | 79 | NW | 1959 | |
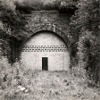 bpm00464.jpg |
CTD | Cadoxton South junction & Trehafod junction | Bricked up south-east portal of 1323 yard Pontypridd Tunnel (The Graig) Tunnel ran from 14M-17C to 14M-77C.(Black & white photo�) | North-west of former Treforest High Level station | 14 | 15.5 | SE | 1959 | |
 bpm00465.jpg |
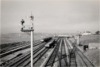
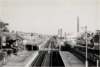
VOG | Vale of Glamorgan | Black & White photo� of Aberthaw East station & yard after the addition of reception sidings for coal traffic to the then newly-built Aberthaw Power Station. The down line wooden bracket signal was located beyond a stone-arched road overbridge giving access to Pleasant Harbour and so for good sighting by drivers, it was a very tall structure, visible above the bridge sidewalls. It was later removed and a 3-doll BRWR bracket signal was posistioned 519 yards to the east of the signal box seen on the down platform. The up line wooden bracket signal was also replaced by a steel unit but after closure to passenger traffic in 1964, the up platform line and sidings were removed and the unit 'lost' its RH arm. Private bungalows are now situated on the up platform | Road overbridge to Pleasant Harbour & old limeworks, East Aberthaw | 4 | 65 | East | 1960 | |
 bpm00466.jpg |
VOG | Vale of Glamorgan | Partial view of Southerndown Road signal box on last day of stopping passenger trains at the station. Signalman Bob Price in window (Black & white) | Southerndown Road station | 15 | 06 | South | 23-Oct-61 | |
 bpm00467.jpg |
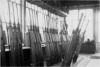
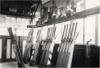
VOG | Vale of Glamorgan | Partial view of signal lever frame (Black & white) | Southerndown Road signal box | 15 | 06 | East | 23-Oct-61 | |
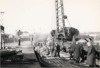
 bpm00468.jpg |
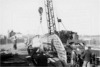
VOG | Vale of Glamorgan | Permanent way civil engineering gang manhandling removal of footbridge which spanned four tracks at station (Black & white) | Southerndown Road station | 15 | 06 | SE | 1961 | |
 bpm00469.jpg |
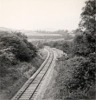
LTR | Mwyndy junction & Tonteg junction | View of single line at rail overbridge south of Beddau when line was fully operational between Llantrisant & Treforest, mainly for Cwm Colliery coke traffic (Black & white) | Rail overbridge between Beddau & Efail Isaf | 2 | 49 | SW | 1961 | |
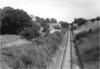 bpm00470.jpg |
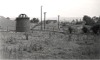
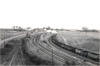
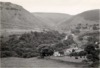
LTO | Waterhall junction & Common Branch junction | Single line branch from Waterhall junction to Common Branch junction (Serving Creigiau Quarry). The double track viaduct in the distance carried the Penrhos branch. Just beyond the viaduct, at 4M-66C, the former Crofft-y-Guinea siding branched off the single line, to the left as viewed, passed under the viaduct & terminated alongside the road to the left of camera point. It was used extensively during the second world war to serve as a rail freight service point for the former Rhydlafar Hospital which was tied up with the American occupation in Britain.(Black & white photo�) | St.Fagans road overbridge adjacent to former Crofft-y-Guinea siding | 4 | 78 | NW | 1961 | |
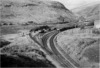 bpm00471.jpg |
BAL | Bridgend & Abergwynfi | Black & white view of sidings fan & branch to Glyncorrwg as seen from A4107 hairpin bend over top of NW portal of Cymmer tunnel. The former South Wales Mineral Railway trackbed can be seen running left to right & this merged with the single line beyond the 110-yard Cymmer steel viaduct located at 11M-22C. The junction mileages beyond were 11M-32C & 9M-40C(SWMin RLy). In the final years, the Bridgend-Treherbert passenger service used the extreme right curve into Cymmer Afan station, finally renamed Cymmer General | Cymmer Afan | 11 | 10 | South | 1961 | |
 bpm00472.jpg |
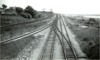
CTD | Cadoxton South junction & Trehafod junction | View at track level of line approaching Tonteg junction with single line skew 60-yard viaduct of Llantrisant branch(at 4M-75C) crossing above. (Black & white photo�) | South of Tonteg junction near down advanced starting signal | South | 1961 | |||
 bpm00473.jpg |
BND MEX |
Brecon & Dowlais Merthyr extension | Black & white view of three ventilator shaft stacks for former LMS Morlais tunnel at Pant showing Pant to Dowlais Central branch line passing area towards Pantyscallog. The Brecon Mountain Railway headquarters & carpark now stand in this area. The stacks remain and the nearest is right alongside the Brecon Mountain Railway headquarters and loco' workshop | Adjacent to former Pant (Newport-Brecon line) station. The stated mileage is estimated and is the BND figure | ~18 | 72 | SW | 1960 | |
 bpm00474.jpg |
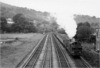
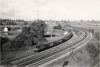
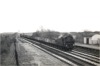
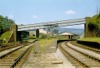
CAM | Cardiff (Bute Road) & Merthyr | 0-6-2 Collett tank loco' with loaded coal train, running on down main line towards Taffs Well and showing all four lines when in use between Pontypridd & Llandaff North. The river Taff viaduct is just visible at the start of the curve near the semaphore signals. (Black & white photo') | Old A470 road overbridge at boundary of Taffs Well with Glanyllyn | 7 | 65.5 | 0 | 1960 | |
 bpm00475.jpg |
RSB BAL |
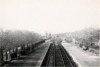
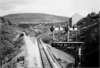
Rhondda & Swansea Bay & Bridgend & Abergwynfi | View of Blaengwynfi station, signal box & southwest portal of 3443-yard Rhondda tunnel with single line branch to Abergwynfi in foreground | A4170 road between Cymmer Afan & Abergwynfi | East | 1960 | |||
 bpm00476.jpg |
WNT | Walnut Tree | Poor quality black & white view of Penrhos junction & signal box | Penrhos junction, west of Caerphilly |
9 12 |
45 38 |
East | ||
 bpm00477.jpg |
VOG | Vale of Glamorgan | Black & white view of Rhoose signal box, level crossing and cement works | Station footbridge, former Rhoose station (Station now reinstated but up platform is beyond the level crossing) | 3 | 26 | West | 1958 | |
 bpm00478.jpg |
VOG | Vale of Glamorgan | Loaded coal train being hauled down the incline of the then, recently installed double line to Aberthaw "A" power station. The loco was a 56XX 0-6-2 Tank class | Top of Fuel oil storage tank at Aberthaw cement works | NE | ||||
 bpm00479.jpg |
VOG | Vale of Glamorgan | Black & white view of Rhoose station and up relief siding | Station footbridge, former Rhoose station | 3 | 26 | East | ||
 bpm00480.jpg |
CTD | Cadoxton South junction & Trehafod junction | Black & white view from overgrown trackbed of former Cadoxton-Trehafod line, north of Tonteg junction and looking towards Tonteg signal box | North of Tonteg junction |
5 12 |
28 32 |
North | ||
 bpm00481.jpg |
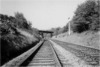
LTO | Waterhall junction & Common Branch junction | Out-of-use single line between Creigiau Quarry & Common Branch junction. This was brought back into use in 1964 but was lifted after the closure of the quarry in the 1970s. (Black & white) | Road overbridge between Creigiau & Efail Isaf (Near the C�sar�s Arms) | 8 | 13 | West | 1960 | |
 bpm00482.jpg |
CTD | Cadoxton South junction & Trehafod junction | Internal view of lever frame & block instruments at Tonteg junction signal box (Black & white) | Tonteg junction signal box | 12 | 24 | 1960 | ||
 bpm00483.jpg |
VOG | Vale of Glamorgan | View of Southerndown Road station on the last day of stopping passenger trains | Southerndown Road station | 15 | 05 | SE | 23-Oct-61 | |
 bpm00484.jpg |
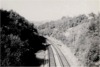
RSB | Rhondda & Swansea Bay & Bridgend & Abergwynfi | View of the then recently re-aligned line north of Cymmer Afan station where the R&SB line via Gelli tunnel was lifted & commoned with the Bridgend & Abergwynfi line to diverge at Gelli junction (made in 1960) further up the valley. The 115-yard Groeserw viaduct is seen in the view & its location is 5M-34C from R&SB junction at Treherbert. The Bridgend & Abergwynfi single line originally came through on the right where the trackbed can be seen (Black & white) | Road overbridge immediately north of former Cymmer Afan station | 5 | 44 | West | 1961 | |
 bpm00485.jpg |
HEF | Hendreforgan | Black & white view of facing points with mechanical detection where no facing-point lock was fitted | Gellirhaidd junction, Tonyrefail (Former line to Blackmill and Gilfach Goch) | 0 | 30 | 1961 | ||
 bpm00486.jpg |
CTD | Cadoxton South junction & Trehafod junction | View of double line south of Tonteg junction as seen from Tonteg viaduct on the Mwyndy junction-Tonteg junction line | Tonteg Viaduct |
4 11 |
75 00 |
1961 | ||
 bpm00487.jpg |
VOG APS |
Vale of Glamorgan Aberthaw Power Station | Black & white photo� of 0-6-2 Collett loco & empties ascending new incline from Aberthaw Power Station to Aberthaw East station | Aberthaw Cement works inlet | 5 | 42 | 1961 | ||
 bpm00488.jpg |
VOG | Vale of Glamorgan | Then newly laid permanent way west of Aberthaw station, in conjunction with opening of new Aberthaw Power Station | West end reception link with Vale of Glamorgan line | 5 | 16 | NW | 1961 | |
 bpm00489.jpg |
VOG | Vale of Glamorgan | The last 15.20pm Bridgend-Cardiff via Barry, stopping train at Southerndown Road Station | Southerndown Road Station | 15 | 06 | NW | 23-Oct-61 | |
 bpm00490.jpg |
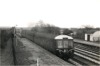
VOG | Vale of Glamorgan | 0-6-2 Collett tank loco' on down empties coal train passing through Southerndown Road Station on the last day of stopping passenger service | Southerndown Road Station | 15 | 06 | NW | 23-Oct-61 | |
 bpm00491.jpg |
VOG | Vale of Glamorgan | Dismantling of station footbridge, Southerndown road | Southerndown Road Station | 15 | 06 | SE | ||
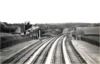 bpm00492.jpg |
VOG | Vale of Glamorgan | View of four-track station from station footbridge, on the last day of stopping passenger service | Southerndown road Station | 15 | 07 | SE | 23-Oct-61 | |
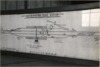 bpm00493.jpg |
VOG | Vale of Glamorgan | Southerndown Road signal box diagram | Southerndown Road station | 15 | 07 | 23-Oct-61 | ||
 bpm00494.jpg |
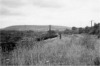
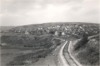
GIL | Gilfach | View of out-of-use single line, looking towards Gilfach Goch | A4093 road overbridge, south of Gilfach Goch and north of Hendreforgan jct | 0 | 36 | SE | 1961 | |
 bpm00495.jpg |
RSB BAL |
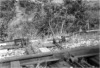
Rhondda & Swansea Bay & Bridgend & Abergwynfi | Black & white view from Croeserw road (A4063) overlooking single Bridgend to Abergwynfi line, after closure of Rhondda & Swansea Bay line through Gelli tunnel (The trackbed to the tunnel is also visible). The Abergwynfi line connected the RSB line through a new alignment further up the valley in 1961, shortly to be followed by the complete closure of this rail system | Overlooking Gelli tunnel & Cymmer Afan valley (Black & white photo�) | South | 1961 | |||
 bpm00496.jpg |
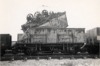
APS | CEGB Aberthaw sidings | Runaway wagon damage, Aberthaw Power station sidings | Aberthaw Power station sidings | ~5 | 76 | SW | 1961 | |
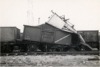 bpm00497.jpg |
APS | CEGB Aberthaw sidings | Runaway wagon damage, Aberthaw Power station sidings | Aberthaw Power station sidings | ~5 | 76 | SW | 1961 | |
 bpm00498.jpg |
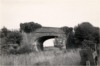
COZ | Common Branch | Black & white photo� of stone skew road overbridge on former line between Common Branch junction & Llantrisant Common junction on Ely Valley line (Closed in 1935) | Llantrisant Common (to the east of Royal Mint) | 0 | 38 | SW | 1961 | |
 bpm00499.jpg |
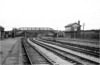
WVL | Gaer junction & Aberbeeg junction | View at north-west end of goods yard showing compound points (double inside slip) & connection to up running line to Nine Mile point line & Risca station beyond | Risca station | 5 | 34 | SE | 11-Jun-67 | 11.20 |
 bpm00500.jpg |
WVL | Gaer junction & Aberbeeg junction | View from north-west end of station, showing overbridge & banner repeater signal. The left-hand lines ran to Nine Mile point & Tredegar & the right hand lines, of which only one survives (2001) ran to Abertillery, Oakdale colliery & Ebbw Vale | Risca station | 5 | 39 | SE | 11-Jun-67 | 11.23 |
| 401-450 <- |
Photos 451-500 |
-> 501-550 | |||||||
|
Date Last Revised:December 01, 2009 |
|||||||||